Here’s some thoughts on optimizing container images using multi-stage builds and distroless images.
Normally, when building container images for running containerized applications, the image itself usually includes an entire OS, package manager, and system utilities, making the image size hundreds of MB to GBs.
This huge size for running a simple binary has an impact on deployment speed, hosting costs, and security posture.
Multi-stage builds and distroless images optimize container image size while maintaining functionality through base image selection and removal of unnecessary runtime dependencies.
Traditional Single-Stage Build
For example, here is what most people start with when containerizing a Java application:
FROM openjdk:11-jdk
WORKDIR /app
COPY . /app
RUN javac Main.java
CMD ["java", "Main"]
This works fine. The application runs. But the final image includes the entire JDK compiler, debugging tools, and libraries. All which is needed for development, but unnecessary at runtime.
The final image might end up with a size of hundreds of MB, for a compiled Java class file that might be 5KB.
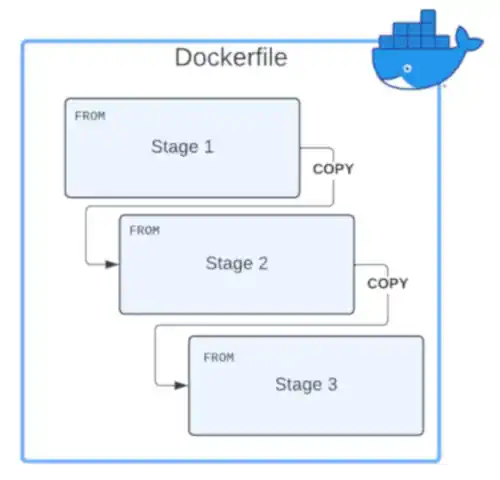
Multi-Stage Builds
With multi-stage builds, you can separate build-time dependencies from runtime requirements. You compile in one stage using all the heavy tooling, and then copy only the final artifact to a minimal runtime image.
For example, for a containerized Java application, the build stage uses the full JDK tools and libraries, while the final imagein stage 2 uses only the JRE-slim to run the compiled code. All dev tools get left behind. This cuts image size by around 40% while keeping the same functionality as traditional single-stage builds.
# Stage 1: Build
FROM openjdk:11-jdk AS build
WORKDIR /app
COPY . /app
RUN javac Main.java

# Stage 2: Runtime
FROM openjdk:11-jre-slim
WORKDIR /app
COPY --from=build /app/Main.class /app/
CMD ["java", "Main"]
Distroless Images
Distroless images take the “image minimization” efforts a step further. For example, a distroless image might be around 2MB.
A distroless image strips away everything except what your containerized application needs to run. No package managers, no shell, no standard Unix utilities. Just the app, its direct runtime dependencies, and minimal parts of a Linux distribution.
For example, for a containerized Java application using multi-stage builds with a distroless image, the resulting image size would be minimal.
# Stage 1: Build
FROM openjdk:11-jdk AS build
WORKDIR /app
COPY . /app
RUN javac Main.java

# Stage 2: Runtime
FROM gcr.io/distroless/java11-debian11
WORKDIR /app
COPY --from=build /app/Main.class /app/
CMD ["Main"]
Important: The CMD instruction in the Dockerfile/Containerfile must use the exec form (["executable", "arg1", "arg2]) rather than the shell form (executable arg1). Without a shell in the image, the shell form won’t work.
Available Distroless Images
Google and Chainguard offer distroless (base and language-specific) images, which include only CA certificates and timezone data in their base images (the bare essentials for most networked applications).
Google Distroless Images
- URL:
gcr.io/distroless. - Google uses Debian-based images built with Bazel.
- Offers the most popular distroless images.
Chainguard Images
- URL:
images.chainguard.dev/directory. - Chainguard uses Wolfi-based images built with apko/melange.
- Focuses on aggressive and faster CVE security patching.
What’s Not Available
Complex applications like databases are not available as distroless images. For example, they require configuration management tools, backup and restore tools, scripts, etc. Too much for a minimal image.
Some things not available in distroless form are:
- Databases: PostgreSQL, MySQL, MongoDB need backup tools, admin CLIs, and configuration utilities.
- Web Servers: Nginx, Apache require configuration management and reload capabilities.
- Others: Redis, Ruby, PHP (no official images available).
The Debugging Challenge
The main tradeoff with distroless images is debugging. No shell means you can’t docker exec into a running container to investigate issues. By design, you don’t want don’t want those tools in production, but it requires different debugging approaches.
Debug Image Variants
Google provides debug variants of their distroless images with busybox included to test and debug where you need shell access.
FROM gcr.io/distroless/java11-debian11:debug
Once the debug is finished remove them. The whole point of distroless is minimizing the attack surface.
Namespace Sharing Technique
You can run a 2nd busybox container that share namespaces (PID and network) with your distroless container for debug purposes only.
This allows tools like ps and ss/netstat to show the same processes and connections as the target container.
# Start distroless container
docker run -d --name myapp gcr.io/distroless/static-debian12 /app

# Attach a debugger container
docker run --rm -it \
  --name debugger \
  --pid container:myapp \
  --network container:myapp \
  busybox sh
This approach is lightweight and doesn’t require restarting your application container.
Kubernetes Ephemeral Containers
If you’re running on Kubernetes, ephemeral containers provide built-in debugging:
kubectl debug -it <pod_name> \
  --image=alpine \
  --target=<container_name>
This creates a temporary debugging container sharing namespaces with the target pod. Similar to regular namespace sharing but integrated into Kubernetes.
Why Image Size Matters
When you build a container image the traditional way, everything used during the build process ends up in the final image.
For example, if you need a compiler to build app, it will be included in the image. Package managers for installing dependencies? They’re there too. And everything will be in the final image in production.
This bloat creates some problems:
- Deployment Speed: A 400MB image takes much longer to pull than a 10MB one. When scaling horizontally or deploying to multiple hosts, the extra seconds add up quickly.
- Infrastructure Costs: Container registries charge based on storage and bandwidth. A 400MB image stored across 10 versions costs more money.
- Security Surface Area: Every binary, library, and package is a potential vulnerability. CVEs can impact components you never use but happen to exist in the image. Smaller images mean fewer components to patch.
- Resource efficiency: Smaller images mean faster starts, less memory pressure, and more efficient disk I/O.
With a small image size, you are not only saving storage space costs, but also improving your security posture, and making application deployment faster.

Distroless, Alpine, or Standard Images?
Alpine is a lightweight Linux distribution. Its small size can rival distroless and could be a better choice than distroless when building a minimal container image.
The choice between distroless, Alpine, and standard minimal images isn’t about one being “better”, as everything in life, it depends on your use case.
Some comparison information:
| Aspect | Distroless | Alpine | Standard Minimal (debian-slim) |
|---|---|---|---|
| Image Size | Smallest (static: ~2MB, Java: ~40-120MB) | Very small (base: ~5MB, Java: ~80-150MB) | Small (base: ~25MB, Java: ~200-250MB) |
| Security | Minimal attack surface, no shell | Small surface, includes shell/package manager | Larger surface, full userland tools |
| Debugging | Difficult (no shell, no utilities) | Easy (shell, standard Unix tools) | Easy (full toolset available) |
| CVE Count | Lowest (minimal packages) | Low (small package set) | Higher (more packages installed) |
| Compatibility | Standard glibc | musl libc (can cause compatibility issues) | Standard glibc, widest compatibility |
| Use Case | Production, security-first | Development, debugging, general use | Legacy apps, maximum compatibility |
When To Use Distroless
- Production Environments: Where security and efficiency is more important than debugging convenience. You usually have good logging / observability.
- Running Statically-Linked Applications: When running Go and Rust programs with no dependencies. No operating system or packaging systems are needed.
- Security is Top Priority: Where security is top of mind and reducing the attack surface and isolation is very important.
When To Use Alpine
- Development Environments: Where you need quick iteration and the ability to install tools on the fly via its package manager.
- Debugging Needed: When you need to troubleshoot issues by exec’ing into containers. Alpine provides a shell and common utilities without excessive bloat.
- Runtime Tooling Required: Applications that need
curl,wget,nc, or other utilities at runtime. - Don’t Mind Compatibility: When your app doesn’t depend on glibc-specific features. Most apps work fine with musl libc. C/C++ applications compiled against glibc may have issues.
When To Use Standard Minimal Images
Use standard minimal images like debian-slim or ubuntu-minimal when:
- Maximum Compatibility: Legacy applications that expect specific system libraries or glibc behavior.
- Mixed Workloads: When running multiple applications with different requirements in the same cluster. Standardizing on Debian-slim can simplify operations even if it’s not optimal for every service.

Best Practices
A few things I’ve learned working with distroless images:
- Always Use Multi-Stage Builds: Even if you’re not using a distroless image. The separation between build and runtime environments is good practice regardless.
- Pin Your Base Image Versions: Use tags or SHA256 digests rather than
latestto use a specific image version. This ensures reproducible builds and makes rollbacks predictable. - Scan Your Images Regularly: Scan your container images regularly for vulnerabilities.
In The End
Multi-stage builds and distroless images are a simple and really good solution to not only reduce the image size of container images, but also provide better security and speed, which becomes increasingly important as you scale. The key is understanding the tradeoffs and why would you choose a normal build, distroless, a minimal image, or alpine.