Table of Contents
Having basic security hygiene is essential, even though it’s a never ending process and perfect security doesn’t exist.
This topic is very extensive and is constantly evolving. So decided to split it into multiple parts. This part covers only full disk encryption, user account lockdown, and PAM configuration for user authentication.
Full Disk Encryption with LUKS
Data-at-rest encryption is a must. If someone gets physical access to your hardware, full disk encryption is the only thing protecting your data from being read directly off the drive.
Linux uses LUKS (Linux Unified Key Setup) for disk encryption.
What is LUKS?
LUKS adds an encryption layer between the physical block device (the hard drive’s representation inside Linux) and the filesystem (ext4, xfs, btrfs…).
It uses the kernel’s device mapper to create a mapping between the encrypted physical drive and a decrypted logical volume. When you’re using your computer, applications see just a regular decrypted device in /dev/mapper/. They’re unaware of the encryption.
When you encrypt a drive, LUKS adds a header with metadata about the encryption (cipher, key size, key derivation function) and up to 32 key slots in LUKS2. These key slots can store passphrases or key files that unlock the same encrypted volume, so they can be used by multiple users to decrypt the drive using their own credentials stored in separate slots.
Keep in mind that to access a LUKS-encrypted volume, you need to decrypt it first. So data is only encrypted when the volume is closed (manually locked or when you shut down the computer). While you’re working with the volume, data is decrypted in memory.
LUKS1 vs LUKS2
In modern systems LUKS2 is the default, which provides more keyslots and some improvements.
- Up to 32 keyslots (vs 8 in LUKS1)
- Argon2 key derivation (resistant to GPU-based attacks)
- Authenticated encryption support
- Better header resilience
- Online re-encryption support (encrypt existing data without reformatting)
Key Derivation Functions
The key derivation function determines how your passphrase is converted into an encryption key:
- PBKDF2 (LUKS1 default): Fast but vulnerable to GPU-accelerated brute-force attacks
- Argon2i (LUKS2 default): Memory-hard algorithm that resists GPU attacks and cache-timing attacks
- Argon2id: Hybrid approach with best overall protection against both GPU and side-channel attacks
Setting Up LUKS Encryption
You cannot encrypt a drive that’s currently in use. You need either a new drive or if using an existing one, backup the data, format the drive, encrypt it, and then restore.
Most Linux distros offer LUKS setup during install (usually just by clicking a checkbox). You’ll just be asked to wipe the drive and enter a passphrase. This is the easiest approach.
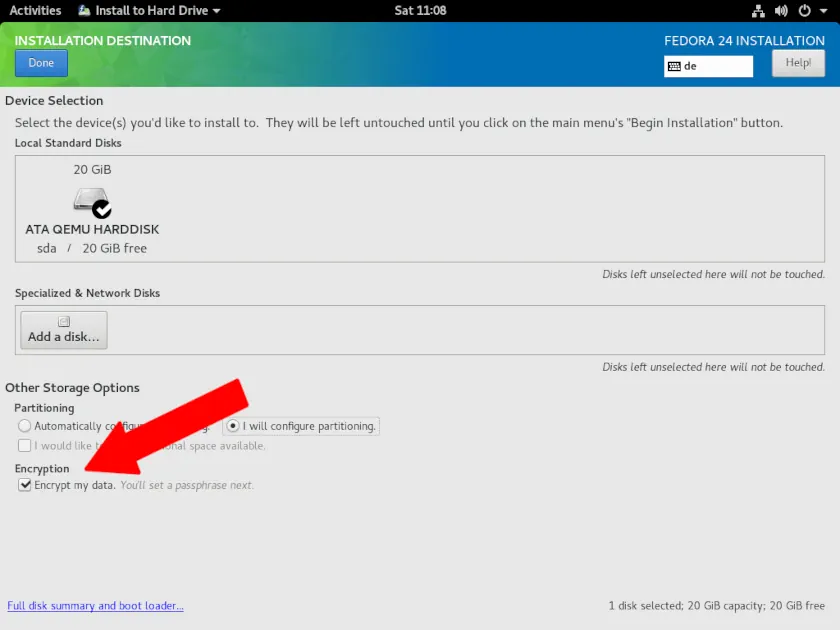
source: image found in fedoramagazine
Encrypt a Drive After Install
# Check if a device is already LUKS-encrypted
cryptsetup isLuks -v /dev/sdb1

# Format the device with LUKS encryption (you'll be prompted for a passphrase)
cryptsetup luksFormat /dev/sdb1

# Use specific cipher and key size for more control
cryptsetup luksFormat --cipher aes-xts-plain64 --key-size 512 /dev/sdb1

# Specify key derivation function
cryptsetup luksFormat --type luks2 --pbkdf argon2id --pbkdf-memory 1048576 /dev/sdb1
Create LUKS Volume with Detached Header
Storing the LUKS header separately is more secure. Without access to the external header file, the encrypted drive remains inaccessible. This is kinda extreme, but you can store the header on a USB drive.
# Create LUKS with detached header
cryptsetup luksFormat /dev/sdb1 --header /root/luks-header.img

# Open with detached header
cryptsetup luksOpen /dev/sdb1 encrypted-data --header /root/luks-header.img
Working with LUKS
View Current LUKS Version
# Check LUKS version
cryptsetup luksDump /dev/sdb1 | grep Version
Backup LUKS Header
If the LUKS header gets corrupted (bad sector, filesystem corruption) your encrypted data will be unrecoverable. Back up your LUKS header immediately after encrypting any drive.
# Backup LUKS header (do this immediately after encryption)
cryptsetup luksHeaderBackup /dev/sdb1 --header-backup-file /root/luks-header-backup.img

# Store backup on separate media (USB drive, password manager, cloud storage)
# DO NOT store it on the encrypted drive itself

# Restore corrupted header
cryptsetup luksHeaderRestore /dev/sdb1 --header-backup-file /root/luks-header-backup.img

# Check header integrity
cryptsetup luksDump /dev/sdb1
Manually Open LUKS Volume
Once drive is encrypted, you need to open the LUKS volume to access it contents.
# Open the LUKS volume with a device mapper name (creates /dev/mapper/encrypted-data)
cryptsetup luksOpen /dev/sdb1 encrypted-data

# Format the decrypted volume with a filesystem (here, xfs)
mkfs.xfs /dev/mapper/encrypted-data

# Mount the volume like any other device
mount /dev/mapper/encrypted-data /mnt/secure
Manually Close LUKS Volume
Close the open LUKS volume to restrict access. This removes the device mapper entry to ensure the contents are no longer accessible.
# Unmount the filesystem first
umount /mnt/secure

# Close the LUKS volume
cryptsetup luksClose encrypted-data

# Alternative shorter syntax
cryptsetup close encrypted-data
Working with Key Slots
You can add keys to different key slots to have multiple decryption methods (this is useful for multi-user systems or recovery).
I just use slot 0 for my primary passphrase and slot 1 for recovery (saved in password manager).
# View current key slots and their status
cryptsetup luksDump /dev/sdb1 | grep "Key Slot"

# Add a new passphrase to an available slot
cryptsetup luksAddKey /dev/sdb1

# Add a keyfile instead of a passphrase
cryptsetup luksAddKey /dev/sdb1 /path/to/keyfile

# Add to a specific slot number
cryptsetup luksAddKey --key-slot 2 /dev/sdb1

# Change an existing passphrase
cryptsetup luksChangeKey /dev/sdb1

# Remove a key slot
cryptsetup luksKillSlot /dev/sdb1 1
Auto-Mounting with Keyfiles
Add key files to auto-mount the drive at boot (this is setup automatically if you add LUKS encryption at install).
Create keyfile.
# Generate a random 4096-byte keyfile
dd if=/dev/urandom of=/root/luks-keyfile bs=4096 count=1

# Restrict permissions (critical—prevent unauthorized access)
chmod 400 /root/luks-keyfile

# Add it to the LUKS volume
cryptsetup luksAddKey /dev/sdb1 /root/luks-keyfile
Configure automatic decryption in /etc/crypttab.
# Syntax: name device keyfile options
encrypted-data  /dev/sdb1  /root/luks-keyfile  luks
Add the auto-mount entry in /etc/fstab.
# Use the device mapper name in /etc/fstab
/dev/mapper/encrypted-data  /mnt/secure  xfs  defaults  0 0
The LUKS volume now automatically decrypts and mounts at boot. Data remains encrypted when the system is powered off or when during pre-boot stages.
Encrypted Swap
If you’re using swap space, you must also encrypt it. Else, sensitive data that gets paged to swap during your session stays there unencrypted on disk.
# Random key for swap (regenerated each boot)
# Add to /etc/crypttab
swap    /dev/sda2    /dev/urandom    swap,cipher=aes-xts-plain64,size=512

# In /etc/fstab
/dev/mapper/swap    none    swap    defaults    0 0
User Account Security
Disable Root Login
Running as root is not a good idea. Disable the root account and just use a regular user with sudo privileges instead.
This prevents anyone from logging in as root, either at the console or via SSH. You can still get root privileges through sudo or by using sudo -i for an interactive root shell.
# Lock the root account
passwd -l root

# Deny root login via SSH /etc/ssh/sshd_config
vim /etc/ssh/sshd_config
PermitRootLogin no
Session Timeouts
Auto-logout inactive users in /etc/profile.
# Add to /etc/profile
TMOUT=900  # Auto-logout after 15 minutes of inactivity
readonly TMOUT
export TMOUT
Password History
Prevent users from cycling through and reusing recent passwords. Most distros remember the last 10 passwords by default, so you can increase this number to prevent users from reusing old passwords. A little extreme for me but good to know.
Change the config in /etc/security/pwhistory.conf.
# Increase to 24 (common in enterprise Linux environments)
remember = 24
enforce_for_root
Restrict Home Directory Permissions
The default home directory permissions on some distros are too permissive, as “other” users can often read files in your home directory.
Change existing home directory permissions.
# Remove read access for others
chmod o-r $HOME

# More explicitly, set to owner-only access
chmod 700 $HOME
Set restrictive defaults for new users in /etc/login.defs.
# Set restrictive umask for new files
UMASK 077

# Set home directory permissions to owner-only
HOME_MODE 0700
Set restrictive umask for existing users’ new files in ~/.bashrc (or better, in the drop-in directory ~/.bashrc.d/).
# Set umask for new files created by this user
umask 027

# Or more restrictive (owner-only access)
umask 077
Configure Sudo Access
sudo allows configured users to execute commands with elevated privileges or as another user without knowing the target user’s password. Ensure this is properly configured.
Edit /etc/sudoers with visudo, which validates syntax before saving.
# Edit /etc/sudoers
visudo

# Better: create a custom config file in the sudoers drop-in directory
visudo -f /etc/sudoers.d/custom
Some good sudo security settings:
# Require password for every sudo command
Defaults timestamp_timeout=0

# Or set a 5-minute timeout fo asking the user for the password again if too annoying
Defaults timestamp_timeout=5

# Use sudo aliases
# Syntax: User_Alias NAME = user1, user2, %group1, ...
User_Alias ADMINS = alice, bob, %sysadmin

# Syntax: Host_Alias NAME = host1, host2, ...
Host_Alias PRODUCTION = prod-web01, prod-db01, 10.0.1.0/24

# Syntax: Cmnd_Alias NAME = /path/to/command1, /path/to/command2, ...
# Very important! When commands are listed with specific arguments, only those exact argument combinations are permitted. Also, don't use wildcards as for example, a command like `/usr/bin/systemctl * sshd` allows `systemctl stop sshd`, `systemctl restart sshd`, etc. Dangerous!
Cmnd_Alias SERVICES = /usr/bin/systemctl, /usr/sbin/service
Cmnd_Alias SOFTWARE = /usr/bin/dnf, /usr/bin/yum, /usr/bin/rpm

# All together, sudo rule using aliases
ADMINS PRODUCTION=(ALL) SOFTWARE, SERVICES
Check you user’s sudo privileges.
# List your own sudo privileges
sudo -l
Password Aging Policy
Set password aging for new users in /etc/login.defs.
# Max password age in days
PASS_MAX_DAYS   90

# Min days between password changes (prevents immediate cycling back to old passwords)
PASS_MIN_DAYS   1

# Days before expiration to warn user
PASS_WARN_AGE   7

# Min password length (legacy setting, use pwquality instead)
PASS_MIN_LEN    8
Configure password aging for existing users:
# View current password aging settings
chage -l username

# Set password to expire in 90 days
chage -M 90 username

# Set minimum days between password changes
chage -m 7 username

# Force password change at next login
chage -d 0 username

# Set account expiration date
chage -E 2025-12-31 username

# Interactive configuration mode
chage username
Understanding PAM
Understanding (at least at a high-level) PAM is necessary.
PAM is a centralized authentication framework that many applications use to verify user credentials. Without PAM, every application would implement its own authentication logic.
The PAM authentication process works like this:
- Application requests authentication through PAM API
- PAM reads configuration from
/etc/pam.d/for that specific service - PAM loads and executes configured modules in order
- Each module performs its specific authentication check
- PAM combines results and tells the application success or failure
PAM modules fall into four types:
- auth - Verify credentials (passwords, tokens, biometrics, YubiKeys)
- account - Check account status (expiration, access times, lockouts)
- password - Handle password changes and enforce complexity rules
- session - Set up and tear down user sessions (mount home directories, set limits)
PAM control flags determine what happens when a module succeeds or fails:
- requisite - Must succeed or authentication fails immediately, no further modules checked
- sufficient - If this succeeds, skip remaining modules of this type
- required - Must succeed, but PAM continues checking other modules regardless
- optional - Module result only matters if it’s the only module in the stack
- include - Include all lines of given type from another configuration file
Enforce Password Complexity
Password Complexity with pwquality
The pam_pwquality PAM module enforces password complexity requirements through PAM. It uses a “credit” system for defining password strength (you’ll have to specify the number of required digits, uppercase letters, lowercase letters, and special characters).
How it works is kind of confusing but, for example, for minlen = 12 and you set dcredit = 1, a password with one digit gets 1 credit toward the minimum length, so it needs 11 regular characters plus the digit. But if ucredit = -1, uppercase is required but doesn’t reduce the length requirement, you still need 12 characters total including the uppercase.
Configure it in /etc/security/pwquality.conf.
# Credit system clarification:
# Positive value (dcredit = 1): "If password has 1+ digits, reduce minlen by 1"
# Negative value (ucredit = -1): "Password MUST have 1+ uppercase, no length credit"

# Example with minlen = 12:
# dcredit = 1  → Password with digit can be 11 chars total
# ucredit = -1 → Password must have uppercase AND still be 12 chars

dcredit = -1   # Require at least 1 digit
ucredit = -1   # Require at least 1 uppercase
lcredit = -1   # Require at least 1 lowercase
ocredit = -1   # Require at least 1 special character

# Min password length (considering credits)
minlen = 12

# Max consecutive identical characters
maxrepeat = 2

# Max consecutive characters from same character class
maxclassrepeat = 3

# Number of password entry attempts before giving up
retry = 3

# Min different characters from old password
difok = 5

# Check against dictionary words
dictcheck = 1

# Reject passwords containing username
usercheck = 1

# Enforce rules for root user (0=yes, 1=no)
enforce_for_root = 0
Integrate pwquality with PAM
Ensure PAM uses the pwquality module by checking /etc/pam.d/passwd and /etc/pam.d/system-auth.
# In /etc/pam.d/passwd
password    requisite     pam_pwquality.so retry=3
password    sufficient    pam_unix.so sha512 shadow try_first_pass use_authtok
password    required      pam_deny.so

# In /etc/pam.d/system-auth
password    requisite     pam_pwquality.so try_first_pass local_users_only retry=3
password    sufficient    pam_unix.so sha512 shadow try_first_pass use_authtok
password    required      pam_deny.so
Prevent Brute-Force Attacks
The pam_faillock PAM module protects against brute-force password attacks by locking accounts after consecutive failed authentication attempts. This is important for any system, even if not exposed to the network. Note this only protects for PAM-based logins (for example, it doesn’t apply for recovery mode).
Configure faillock behavior in /etc/security/faillock.conf.
# Directory for failed attempt records
dir = /var/run/faillock

# Number of failed attempts before lockout
deny = 4

# Lockout duration in seconds (1200 = 20 minutes)
unlock_time = 1200

# Apply lockout to root account
even_deny_root

# Root-specific lockout duration (if even_deny_root is set)
root_unlock_time = 600

# Enable audit logging
audit

# Lock accounts if faillock can't write to log directory
silent
Test the configuration.
# Attempt to log in with wrong password multiple times
ssh username@localhost

# Check if account is locked
faillock --user username

# Verify you can still unlock
sudo faillock --user username --reset
Enable Faillock with Authselect
On RHEL and Fedora, use authselect profiles rather than manually editing PAM files. This prevents configuration conflicts and ensures consistency across PAM service files.
# Show current authselect profile
authselect current

# List available profiles
authselect list

# List features of a profile
authselect list-features sssd

# Enable faillock feature
authselect enable-feature with-faillock

# Apply changes
authselect apply-changes
Authselect modifies /etc/pam.d/system-auth and /etc/pam.d/password-auth to include faillock checks. The configuration looks like.
# Auth section - check for lockout before authentication
auth        required      pam_faillock.so preauth silent
auth        sufficient    pam_unix.so nullok try_first_pass
auth        [default=die] pam_faillock.so authfail
auth        required      pam_deny.so

# Account section - enforce lockout
account     required      pam_faillock.so
account     required      pam_unix.so
View Failed Login Attempts
# Show all failed attempts system-wide
faillock

# Show failed attempts for specific user
faillock --user username

# More detailed information
faillock --user username --verbose
Login with YubiKey
I’ve added PAM rules to login via YubiKey for more security.
More details here: Using YubiKey for Local Linux Authentication
What’s Next?
In the end, security hardening and privacy is not perfect. There are extreme measures that make you very secure, but makes using the system painful. This is a good balance on usability and security.
Next parts will cover SSH, networking, kernel, LSM (SELinux specifically), systemd, firewall configuration …