Part 2 of a 3-part series on VPNs.
This part focuses more in depth on VPNs. I’ll use my actual Mullvad VPN setup on Fedora Linux to go through what happens when you connect, how the kernel handles traffic, etc.
This post is not an ad of Mullvad, but just a writing from a happy user.
What Happens When You Connect
Here’s the flow of a normal internet connection vs. one going through a VPN:
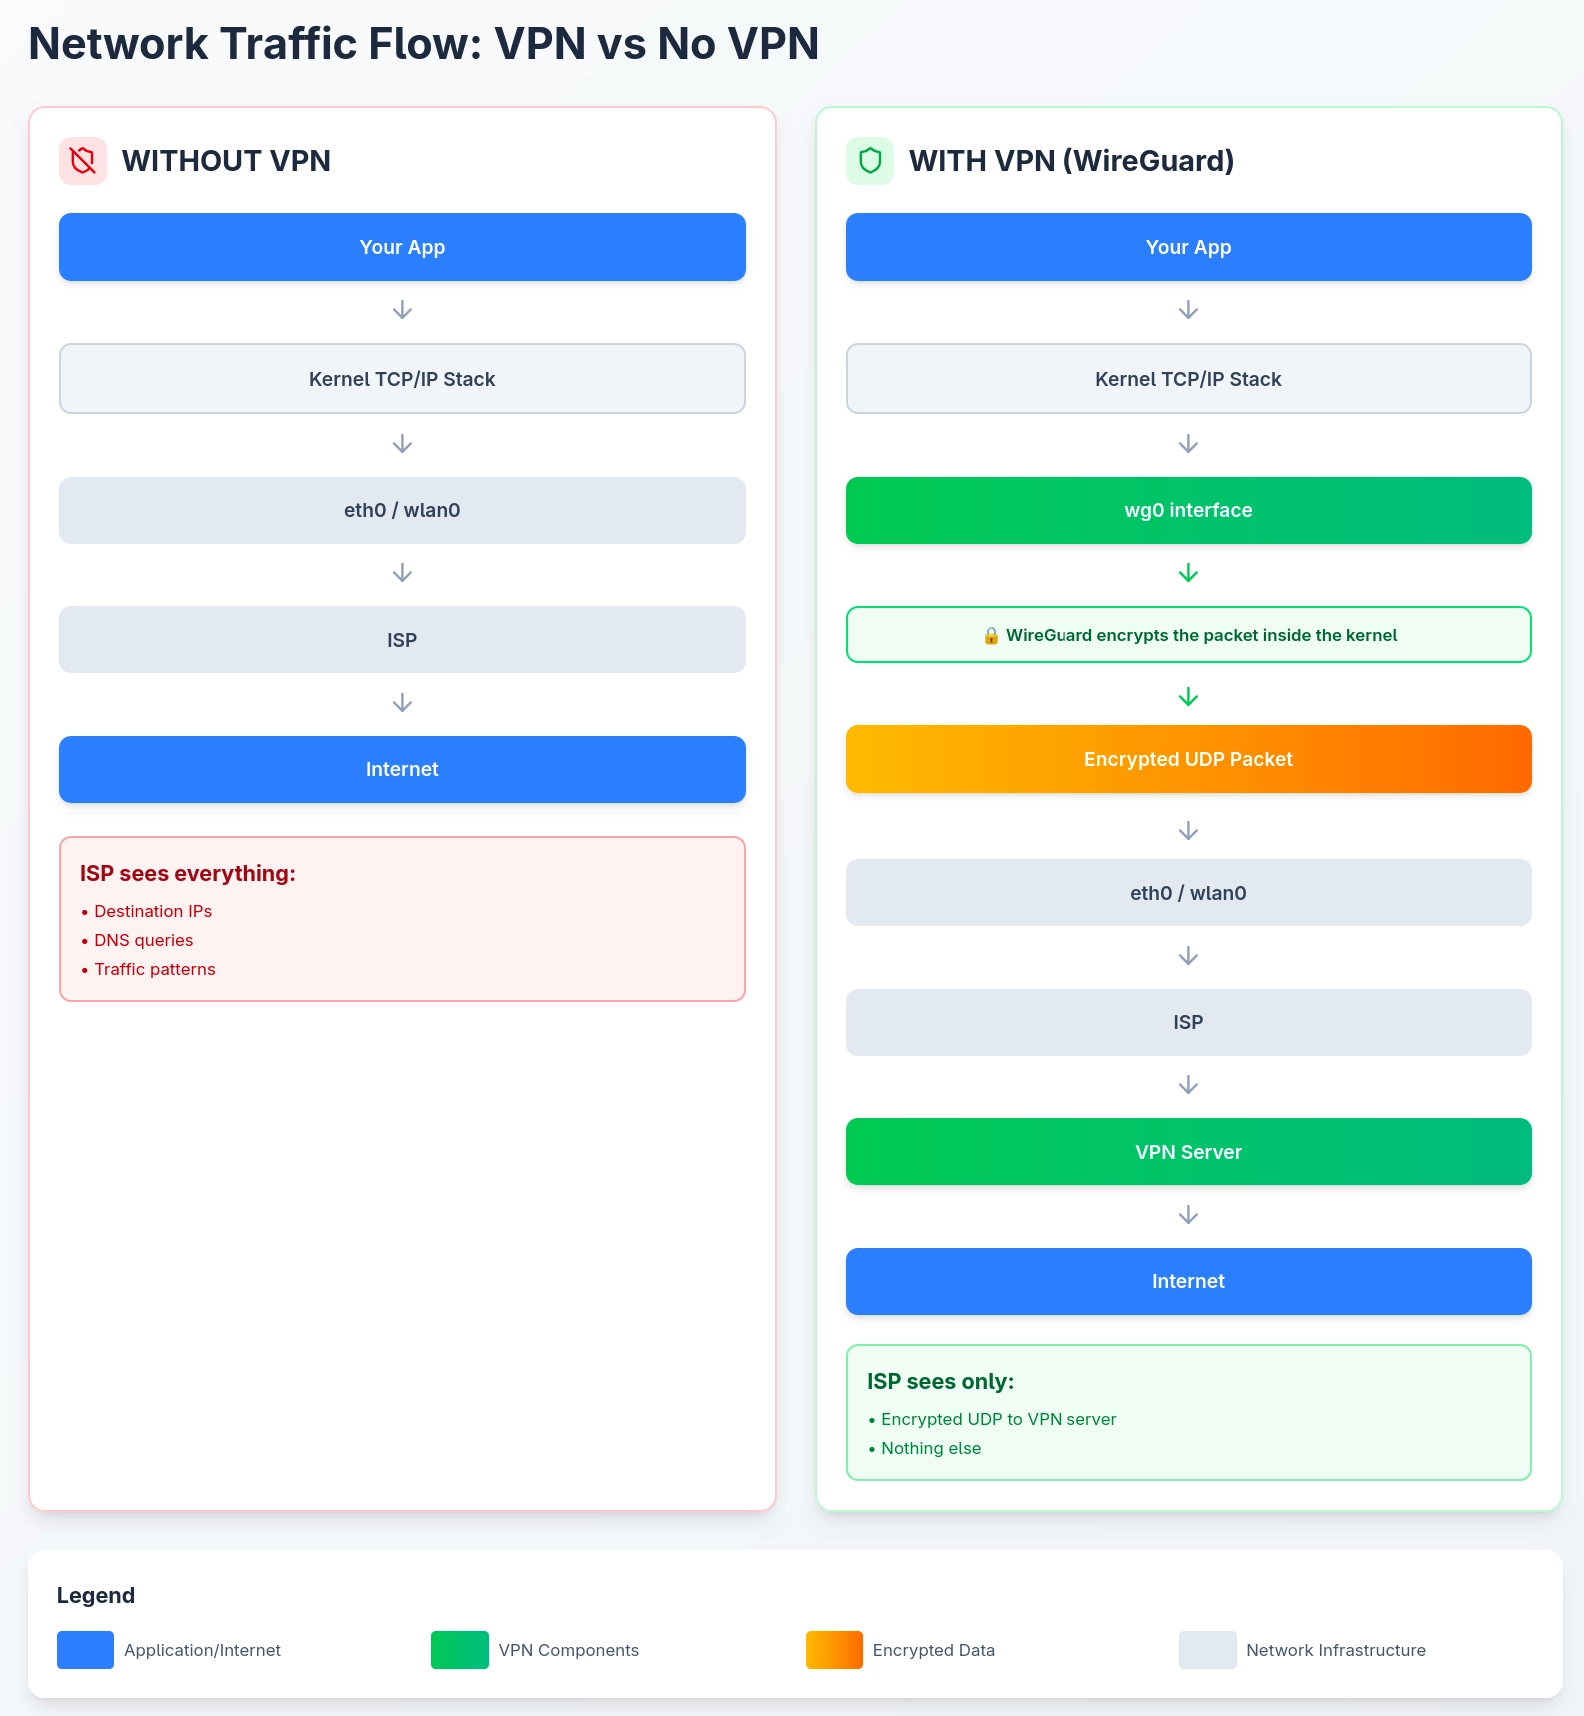
Notice that with a VPN, traffic hits the wg0 interface first, gets encrypted, then goes to the real network interface as an encrypted packet. The ISP only sees the outer packet. Everything inside is encrypted.
Now let’s set this up.
Installing Mullvad on Linux
I use Fedora, but this works on any Linux distro. There are two ways to run Mullvad: using the official app (from https://mullvad.net/) (which handles everything for you), or using raw WireGuard tools (which gives you full control).
Fedora has WireGuard built directly into the kernel, so no third-party dependency is required.
The Official Mullvad App
To install the official Mullvad app in Fedora Linux follow the steps of: https://mullvad.net/en/help/install-mullvad-app-linux#fedora.
# Add the official Mullvad repository
sudo dnf config-manager addrepo --from-repofile=https://repository.mullvad.net/rpm/stable/mullvad.repo

# Install the official app
sudo dnf install mullvad-vpn
After installation, log in and connect using the CLI (you can also do this with the GUI).
# Log in to your Mullvad account ID (you'll get this when you register)
mullvad account login 123456789

# Check account information (account number, expiration, device name)
mullvad account get

# Set your preferred country (Sweden in this example)
mullvad relay set location se

# Connect
mullvad connect

# Check status (relay, features, location)
mullvad status
The official app creates the WireGuard interface, configures routing, sets up the kill switch, handles DNS, everything. Really useful.
What the App Creates
When Mullvad connects, it creates a WireGuard interface. You can see it like this:
ip link show type wireguard

# Output
42: wg0-mullvad: <POINTOPOINT,UP,LOWER_UP> mtu 1380 qdisc noqueue state UNKNOWN
Same as above but view at the specific interface.
ip addr show wg0-mullvad

# Output
42: wg0-mullvad: <POINTOPOINT,UP,LOWER_UP> mtu 1380 qdisc noqueue state UNKNOWN
You can also check the WireGuard configuration (you may need to install the wireguard-tools package if you don’t have it).
sudo wg show

# Output
interface: wg0-mullvad
  public key: <your public key>
  private key: (hidden)
  listening port: 42069
  fwmark: 0xca6c

peer: <Mullvad server public key>
  preshared key: (hidden)
  endpoint: (ip:port)
  allowed ips: 0.0.0.0/0, ::/0
  latest handshake: 8 seconds ago
  transfer: 145.67 MiB received, 12.34 MiB sent
Some things to note in the output:
allowed ips: 0.0.0.0/0, ::/0: This means ALL traffic (IPv4 and IPv6) should go through this peer. It’s a full tunnel.latest handshake: Should be recent. If this is blank or old, the tunnel isn’t working.
Virtual Network Interfaces (wg0-mullvad)
Mullvad automatically creates the wg0-mullvad virtual network interface for the VPN.
On Linux, there are 2 main types of virtual interfaces used by VPNs:
TUN (Layer 3): Handles raw IP packets. No Ethernet headers. This is what OpenVPN uses. The kernel sends an IP packet to the TUN interface, and a userspace program (OpenVPN) reads it from a file descriptor at /dev/net/tun, encrypts it, and sends it out a regular socket.
WireGuard (Kernel Module): WireGuard doesn’t use TUN. It registers its own interface type directly in the kernel. When you create a WireGuard interface, the kernel module itself handles encryption. No userspace involvement.
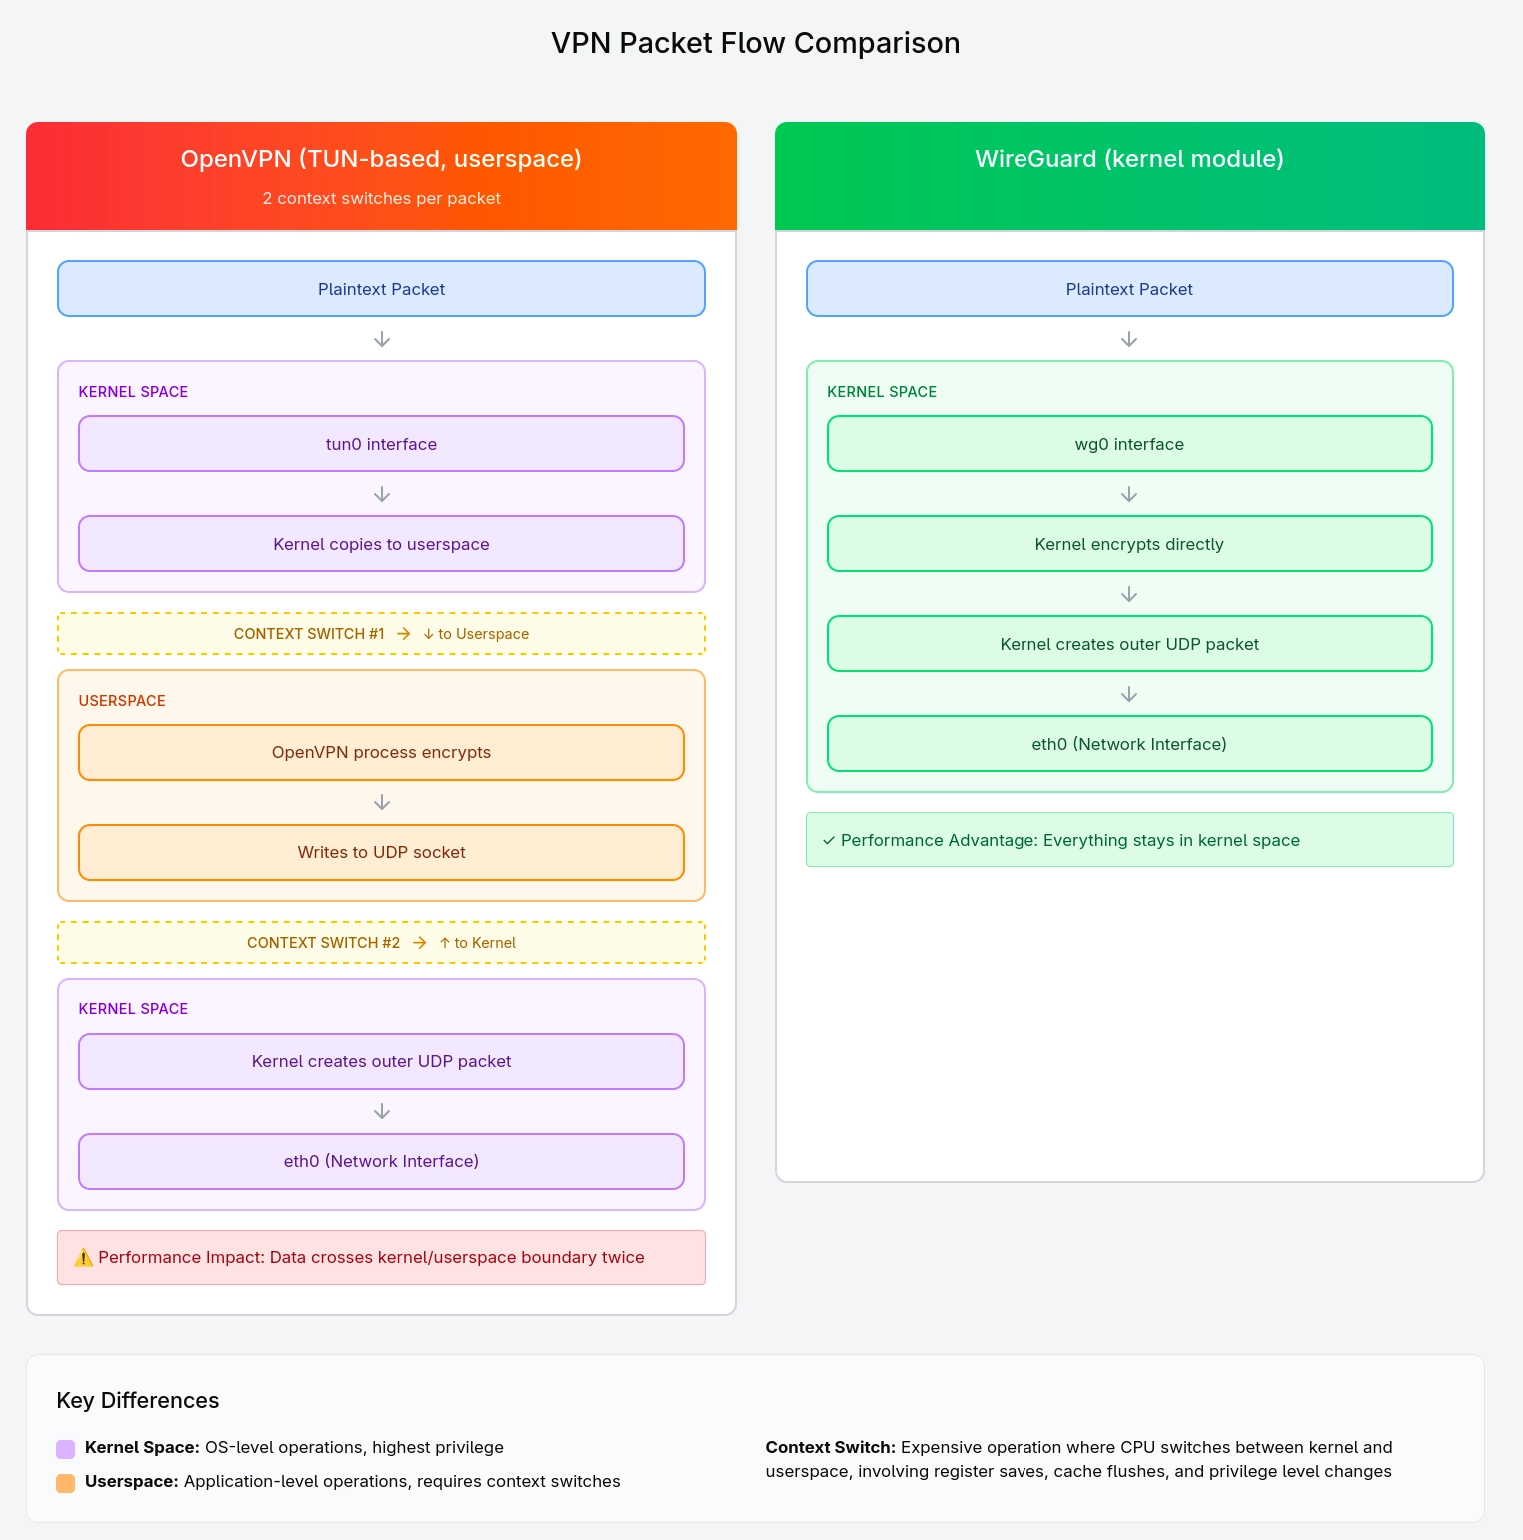
This distinction matters for performance, as every context switch between kernel and userspace costs CPU cycles. That’s why WireGuard is faster than OpenVPN.
You can verify the WireGuard kernel module is loaded.
lsmod | grep wireguard

# Output
wireguard             126976  0
libcurve25519          65536  1 wireguard
ip6_udp_tunnel         16384  2 wireguard,vxlan
udp_tunnel             40960  2 wireguard,vxlan
Tracing a Packet From Your Browser to the Wire
Here’s what happens when you visit a website while connected to Mullvad.
Say your browser requests example.com (93.184.216.34).
The Application Sends Data
Your browser calls send(). The kernel’s TCP/IP stack creates a packet:
- Source IP:
10.66.X.X(your tunnel IP) - Destination IP:
93.184.216.34
The Kernel Consults The Routing Table
Mullvad uses policy routing, so the VPN default route lives in a separate table (not the main one). The kernel checks the policy rules first.
# Show Policy Rules

# Policy rules divert unmarked traffic to the VPN routing table
ip rule show

# Output
0:      from all lookup local
32765:  not from all fwmark 0x6d6f6c65 lookup 1836018789
32766:  from all lookup main
32767:  from all lookup default
# Show VPN Routing Table

# The VPN routing table sends everything through the tunnel
ip route show table 1836018789 # table value from previous output

# Output
default dev wg0-mullvad scope link
# SHow Main Routing Table

# The main table still has your real gateway (for VPN server traffic)
$ ip route show

# Output
default via 192.168.1.1 dev wlan0
10.66.0.0/16 dev wg0-mullvad proto kernel scope link src 10.66.X.X
192.168.1.0/24 dev wlan0 proto kernel scope link src 192.168.1.100
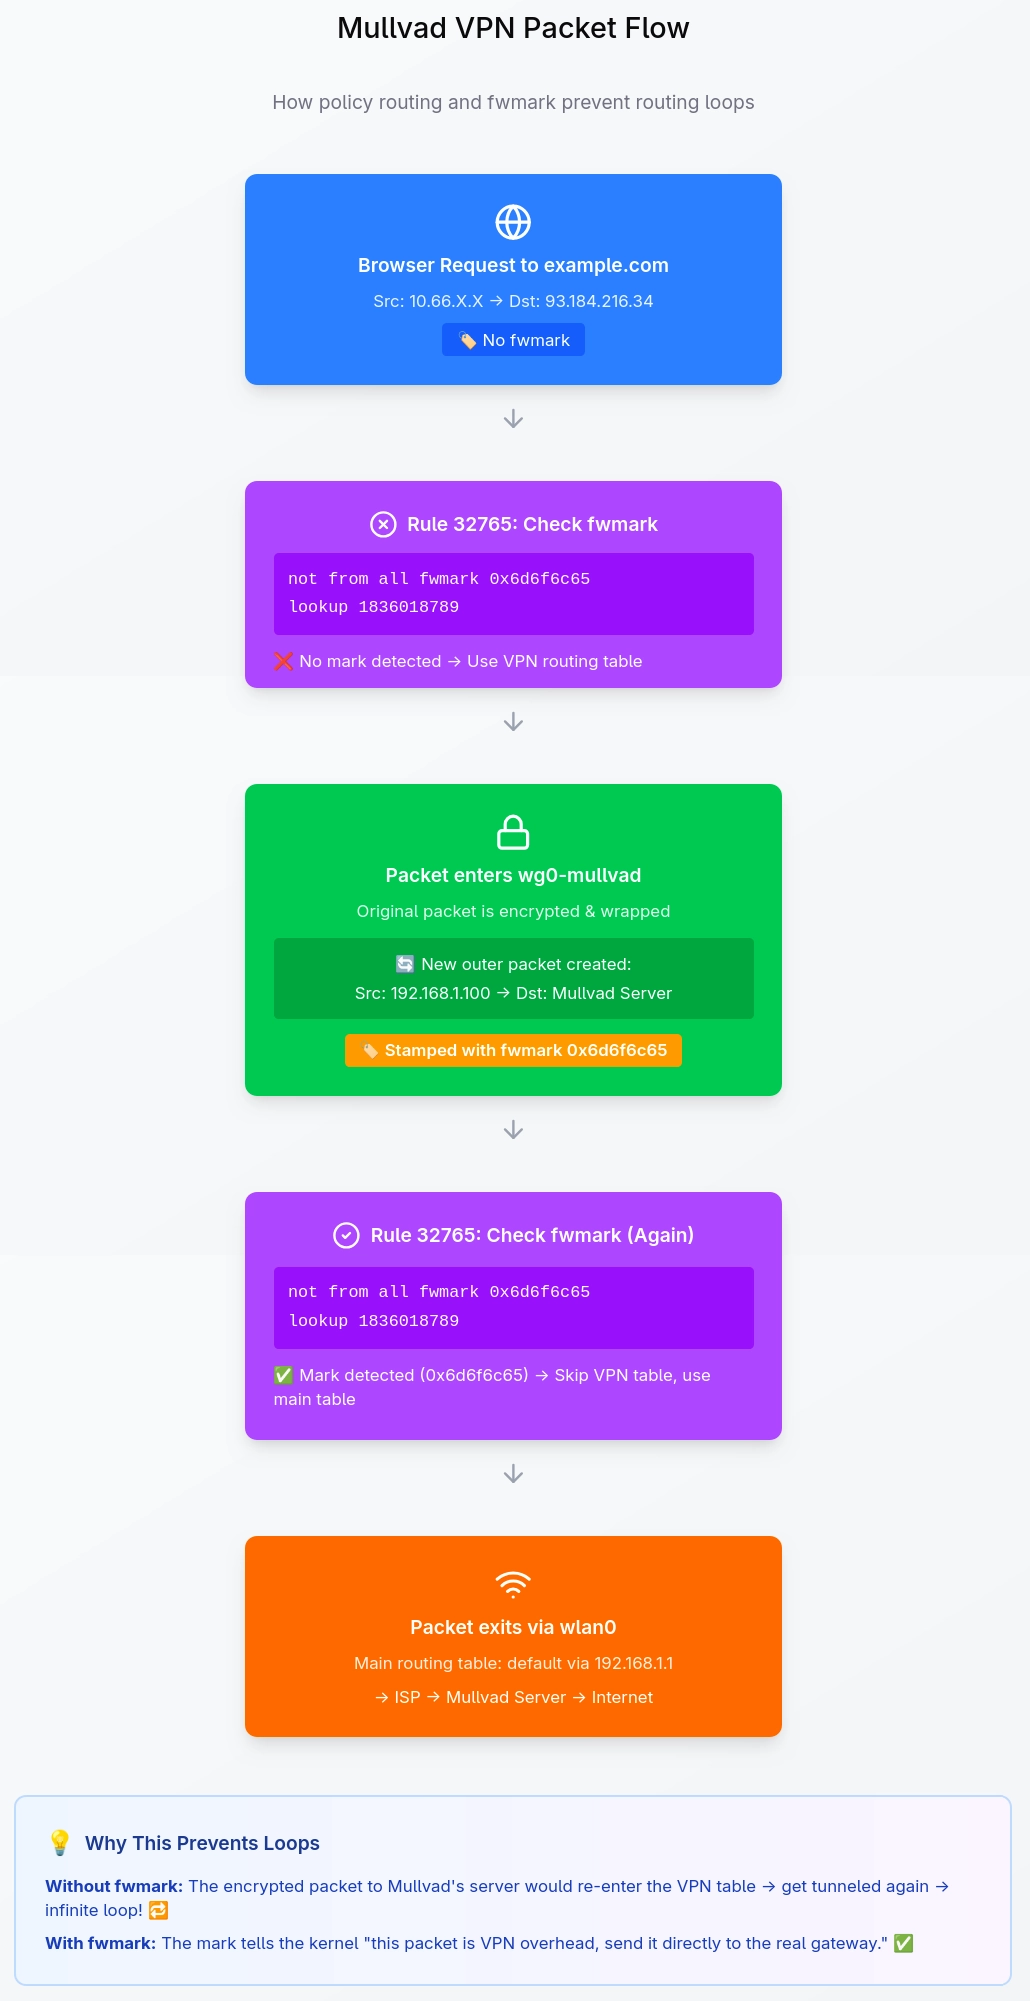
Since our packet to 93.184.216.34 (example.com) has no 0x6d6f6c65 mark, it matches rule 32765 so it gets routed through VPN table 1836018789 → wg0-mullvad interface, where WireGuard encrypts it and stamps it with the mark.
That stamp is the kernel’s way of saying “this packet has already been processed.” On its second pass through the policy rules, the mark causes rule 32765 to skip it, letting it fall through to the main table and out through the real gateway, this time headed to the Mullvad server, not example.com.
Your ISP sees nothing but encrypted UDP traffic destined for a Mullvad IP.
Diagram to Show this Process More Easily
How Mullvad Handles Routing (fwmarks)
A routing loop is what happens when a packet keeps getting sent through the VPN tunnel indefinitely, the tunnel tries to send traffic through itself, which creates another packet that needs to go through the tunnel, which creates another, and so on. Mullvad solves this with firewall marks (fwmark) and policy routing, which is cleaner than the naive fix of adding a static route for each VPN server IP.
Mullvad sets fwmark: 0xca6c on the WireGuard interface (wg0-mullvad), but the routing logic relies on a separate mark (0x6d6f6c65) applied to packets that are already encrypted and destined for the VPN server.
# Policy routing rules
ip rule show

# Output
0:      from all lookup local
32765:  not from all fwmark 0x6d6f6c65 lookup 1836018789
32766:  from all lookup main
32767:  from all lookup default
# What lives in the VPN routing table
ip route show table 1836018789

# Output
default dev wg0-mullvad scope link
The VPN’s default route lives in a separate table (1836018789), not in the main routing table. The main table keeps your original gateway untouched. The policy rule is what decides which table a packet uses:
- Your app sends a packet with no mark
- Rule
32765matches: “no0x6d6f6c65mark? → use VPN table1836018789” - VPN table
1836018789sends it through interfacewg0-mullvad, where it gets encrypted and stamped with0x6d6f6c65 - The encrypted packet hits the rules again, this time rule
32765skips it, it falls through to the main table, and exits throughwlan0to your ISP headed for the Mullvad server.
This prevents routing look with no hardcoded server IPs. If Mullvad changes servers or you switch locations, nothing breaks, the logic is based on packet marks, not destinations.
This same mechanism is what makes split tunneling possible. To bypass the VPN for a specific app, Mullvad marks its traffic with 0x00000f41 (for connection tracking) and 0x6d6f6c65 (for routing), which lets it skip the VPN table and go out through the normal interface. This is exactly how running Mullvad and Tailscale simultaneously works On Mullvad VPN and Linux… and Tailscale, nftables rules mark Tailscale traffic with those same marks, so it routes outside the tunnel while everything else stays encrypted.
More information split tunneling: https://mullvad.net/en/help/split-tunneling-with-the-mullvad-app
The Kill Switch Feature
A kill switch prevents traffic from leaking if the VPN tunnel goes down. When the Mullvad kill switch is active, Mullvad creates nftables (or iptables) rules that drop all traffic not going through the VPN interface.

Check Mullvad’s kill switch status.
mullvad lockdown-mode get

# Output
Block traffic when the VPN is disconnected: on
Enable Mullvad’s kill switch.
mullvad lockdown-mode set on
With this feature, if the WireGuard tunnel drops, there’s no wg0-mullvad interface anymore. All app traffic hits the “DROP everything else” rule. Nothing leaks. No DNS queries go to your ISP. No application traffic goes out unencrypted. Nothing.
The Next Part
For part 3, the plan is to go more in depth, DNS leaks in VPNs, techniques to avoid evading deep packet inspection, specially for environments where VPN connections are actively detected and blocked. Corporate networks, firewalls, etc.